


This is an update of an old mini tut, inspired by the beginning of the then new Out Of Bounds contest format. There were quite a few images using an incorrect or impossible shadow treatment. While there are considerably fewer entries containing this mistake I felt it might be of some help, to beginners particularly, to update it. Essentially this is intended to be of some help to those who are either beginners to graphics programs or new to the OOB concept and would appreciate some very, very basic advice.
Page 1

In very simplified form, this is the error I’m referring to, a shadow cast directly behind the section emerging from the frame. This is an impossible shadow, no surface exists that would make that shadow possible. In any case, considering the light direction, the lighthouse should cast a shadow at an angle away and to the left, not directly behind it.
Even if the light direction called for a straight backwards shadow, this approach would be incorrect.
Page 2

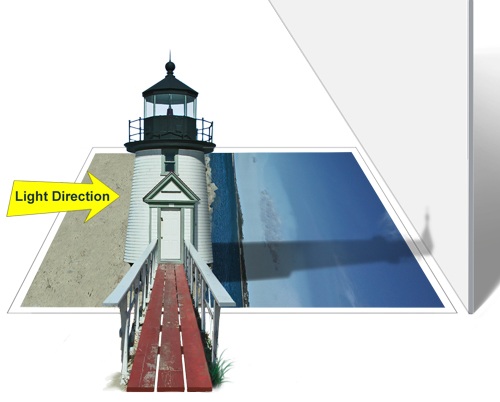
To illustrate the point more clearly, a side view shows that an imaginary surface available to receive a cast shadow from the lighthouse could be no closer than the end of the flat photograph. If the light direction suggested that a shadow should be cast directly back from the lighthouse, it could not look like the shadow in the first image. There is no logical surface that would allow that shadow to be cast.
The largest portion of the shadow would run across the flat image and a small portion would be cast on the imaginary back surface.
Page 3

Following the existing light direction correctly, the shadow would be cast diagonally across the flat image. If for some reason you wanted that rear wall surface to exist, only a small area at the top of the shadow would reflect on it.
Page 4

Since this mini tut is aimed at beginners it seems appropriate to include one simple method
to create a shadow.
With the lighthouse layer active, press the Control key while clicking on that layer in your layers palette. That will give you a selection of the lighthouse and rocks. (all active pixels.) Create a new layer and fill it with black as shown above. (That shadow layer has been moved slightly so it can be seen.)
Page 5

Reduce the opacity of that layer to about 65% or whatever you feel looks correct.
Page 6

I removed the selection “ants”, (Control>D) and used the Distort tool (Edit>Transform>Distort) to manipulate the shadow into a proper angle and size.
I prefer this tool for this sort of manipulation because it gives you almost unlimited control of angle, size, width and taper.
Page 7

This is the final image with what I consider to be a proper shadow. I eliminated all shadows except the one from the lighthouse to keep it simple.
The finishing touches on the shadow included addition of Gaussian Blur (Filter>Blur> Gaussian Blur) and using the eraser tool with a very large soft brush at 5% to lighten the shadow as it recedes from the image casting it, with repeated overlapping strokes. Shadows get lighter and softer as they recede.
It’s important, when doing an OOB image, to consider the space surrounding all the items included in the image. Unless it serves some purpose to indicate there are invisible surfaces that could receive cast shadows, I believe the image usually is enhanced by the illusion of unlimited space.
If you have any questions please site message me.
 |
| before |
 |
| after |
Page 1
In very simplified form, this is the error I’m referring to, a shadow cast directly behind the section emerging from the frame. This is an impossible shadow, no surface exists that would make that shadow possible. In any case, considering the light direction, the lighthouse should cast a shadow at an angle away and to the left, not directly behind it.
Even if the light direction called for a straight backwards shadow, this approach would be incorrect.
Page 2
To illustrate the point more clearly, a side view shows that an imaginary surface available to receive a cast shadow from the lighthouse could be no closer than the end of the flat photograph. If the light direction suggested that a shadow should be cast directly back from the lighthouse, it could not look like the shadow in the first image. There is no logical surface that would allow that shadow to be cast.
The largest portion of the shadow would run across the flat image and a small portion would be cast on the imaginary back surface.
Page 3

Following the existing light direction correctly, the shadow would be cast diagonally across the flat image. If for some reason you wanted that rear wall surface to exist, only a small area at the top of the shadow would reflect on it.
Page 4

Since this mini tut is aimed at beginners it seems appropriate to include one simple method
to create a shadow.
With the lighthouse layer active, press the Control key while clicking on that layer in your layers palette. That will give you a selection of the lighthouse and rocks. (all active pixels.) Create a new layer and fill it with black as shown above. (That shadow layer has been moved slightly so it can be seen.)
Page 5

Reduce the opacity of that layer to about 65% or whatever you feel looks correct.
Page 6

I removed the selection “ants”, (Control>D) and used the Distort tool (Edit>Transform>Distort) to manipulate the shadow into a proper angle and size.
I prefer this tool for this sort of manipulation because it gives you almost unlimited control of angle, size, width and taper.
Page 7

This is the final image with what I consider to be a proper shadow. I eliminated all shadows except the one from the lighthouse to keep it simple.
The finishing touches on the shadow included addition of Gaussian Blur (Filter>Blur> Gaussian Blur) and using the eraser tool with a very large soft brush at 5% to lighten the shadow as it recedes from the image casting it, with repeated overlapping strokes. Shadows get lighter and softer as they recede.
It’s important, when doing an OOB image, to consider the space surrounding all the items included in the image. Unless it serves some purpose to indicate there are invisible surfaces that could receive cast shadows, I believe the image usually is enhanced by the illusion of unlimited space.
If you have any questions please site message me.


Post a Comment